
Welcome to the FlowVision users team! Before you start creating your first project, you need to download the distribution pack and prepare it for work. In this article, we will tell you how to do this, so you can begin simulation of your engineering tasks as quickly as possible.
Here are the steps that will help get you absolutely prepared to run local FlowVision simulations on PC:
Step 1: Download FlowVision and License Manager
Step 2: Install FlowVision and License Manager
Step 3: Register the license
Step 4: Create Solver-Agent user
Step 5: Check the license settings
STEP 1: DOWNLOAD FLOWVISION AND LICENSE MANAGER
- To download the distribution pack, log in to your user account on flowvisioncfd.com. In the sign-in fields enter your username (the name or e-mail adress used to register on the website) and password. If you can`t remember your login data, you can recover it by clicking ‘Forgot Login?’.
- In 'Support and Blog' section click on: Donwload > Latest version of FlowVision:

- Download FlowVision and License manager for Windows OS:
![]()
![]()
STEP 2: INSTALLATION OF FLOWVISION AND LICENSE MANAGER
- Unzip the downloaded files on your disk and run the setup of FlowVision. Start the installation by running FlowVision-windows-installer.exe with Administrator privileges, then follow the installation window instructions. In case of any difficulties, please read the instructions in the FlowVision manual.
- To install the License Manager, run FlowVisionLM-windows-installer.exe. As with the previous step, all further actions are described in the manual.
- Create a folder to store server module settings. This folder must be accessible for reading and writing and must not be located in the directory C:\Program Files\. During the installation process you will need to specify the path to the folder that will be used to store the FlowVision server module settings.
STEP 3: LICENSE REGISTRATION
You can create or open a project (from the tutorial folder in the installation directory, for example) in read-only mode, even without a license. However, a license will be required to save the FVPPP project file and start the calculation on the Solver. So, after successful installation of FlowVision and License Manager let`s proceed to the creation of a license request.
- Run the installed License Manager. This module has no graphic interface, so you can only find out if its running via the Task Manager. If it is, the name FvLicense.exe will appear in the list of active processes. While the License Manager is running, generate a registration file (*.rdb) using either the Pre-PostProcessor or the Terminal. Both methods are shown in the video below.
More details on how to generate a (*.rdb) file
- Send the (*.rdb) file to our sales representative.
- They will answer within two working days with the license file (*.lic) and a text file with its description.
- Make sure License Manager is running and register the license: go to PPP or Terminal and under “Licenses > Register new license” specify the path to the (*.lic) file. A more detailed tutorial on license registration can be found in another article in FlowVision team blog.
You are only able to register the license within the time specified in the license text file. If, for any reason, you did not do this, contact a sales manager for assistance
More details on how to register a license
FLOWVISION HAS A MODULAR STRUCTURE
The Pre-PostProcessor, Terminal, and Viewer are client modules. These applications are equipped with a Graphical User Interface.
The Solver-Agent, Solver, License Manager, MPM-Agent, and Connecter do not have a Graphical User Interface. The user interacts with them only via the client modules.
More information about the structure of FlowVision and the purpose of each module can be found in the manual.
PROJECTS IN FLOWVISION CONSIST OF TWO PARTS: CLIENT AND SERVER.
Modules (client or server) and project parts (client or server) are two different things. When preparing the project (importing geometry, setting substances, physical processes, defining boundary conditions), you are creating the client part of the project. You can select any folder to be used for storing client parts. However, the client directory must be accessible for reading and writing. For this reason the directory C:\Program Files\ cannot be used to store client parts.
The server part contains the results of the simulation. You can`t open the server part of the project in FVPPP. To view the results, you need to open the client part and then connect to the Solver. If the server part is located in the server directory, they will be matched. The server project parts will be stored within the directory specified during the next step - creation of a Solver-Agent user.
Make sure that you have two separate folders (for storing client and server parts) on your PC.
A third folder is needed for storing settings of server modules
FV_client parts – client parts are stored here when saving a project through PPP or Terminal.
FV_server parts – stores server parts. Path to this folder is specified when creating a Solver-Agent user.
FV_settings – stores server module settings. Path to this folder is specified during installation.
STEP 4: CREATION OF SOLVER-AGENT USER
After you install FlowVision and get a license, you need to register a new user in the Solver-Agent:
- Run Solver-Agent and make sure that the process FvSolverAgent.exe has appeared in Windows task manager. (To avoid having to launch the Solver-Agent manually every time after a system restart, you can configure it to be launched automatically via SA service. Among the installation files find InstallSAService.bat and follow this instruction).
- In PPP (by clicking
 ) or Terminal (at launch) the user authorization window will appear. Press the button
  .
. - In the user registration window enter the following required data:
- user name and password: you can create several Solver-Agent users, for example for each new project (the server parts will be stored in different server directories).
- server directory: this is where the server parts of the project will be stored. Don’t use the directory C:\Program Files\, as it is protected from writing.
- License name and password, which can be found in the received license text file.
STEP 5: Check the license setting in PPP
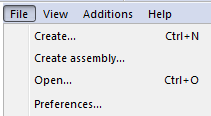
- In PPP go to File > Preferences:
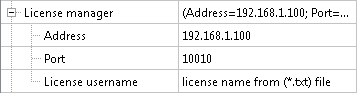
- Check the License Manager settings:
THAT’S IT! NOW YOU'RE READY TO START
As an introduction to FlowVision, you can find a Quick Start tutorial in the documentation or watch a video-tutorial. For a more in-depth look into FlowVision use the tutorial guide. The tutorial provides a step-by-step guide for a variety of cases, increasing in complexity, showing the software capabilities.
We can accelerate your learning process! The FlowVision team offers learning courses - basic and specialized. The basic course reviews FlowVision functionality and the principles of numerical simulation in general. The specialized course is focused on solving your specific tasks. If you are interested in our courses, contact your sales manager for more information.