
You can use formulas in FlowVision to set any variable: from the gravity vector to the law of a moving body motion. All this became possible with the formula Editor. Using the formula Editor you may calculate composite functions, set the physical laws of variable changings and even set the level of adaptation for the calculation grid depending on the step number (and much more!).
In this article we will show how this functionality can significantly simplify the user's life.
There are several ways to set the value of a variable in FlowVision, namely by using:
- constants;
- formulas;
- tables.
If a variable is set as a constant, its value is constant during the calculation process and is strictly equal to the number specified by the user. If you use formula, the value of the variable is considered as a complex function according to a given law. And when a variable is set as a table, its value is found by linear interpolation of the entered table data.
We will consider the second way to set the value of a variable - using a formula.
- Features of the formula Editor
- Toolbox of the formula Editor
- Useful examples: frequently used formulas
Features of the formula editor
The formula Editor is a component of the Pre-Postprocessor that FlowVision uses to work with formulas. Formulas can be used to set values for variables from substance Properties, Boundary conditions, Initial conditions, Modifiers, User variables, and so on. As an experiment, you can open a FlowVision project and run through the project tree. It turns out that almost everything can be set using formulas – from the gravity vector to the law of motion for a Moving body.
In fact, the formula Editor allows you not only to calculate variable values based on specified formulas, but also provides a wide range of functions that are already built-in and ready to use. This set exceeds the basic options of an engineering calculator and contains more complex and relevant settings for a CFD engineer. You may also program your own non-trivial functions in the formula Editor using a wide range of operations, including logical, statistical, and external ones.
toolbox of the formula editor
To create a law, according to which the value of a variable will be calculated, you should: 1) select the variables that will make up the function; 2) link them with operations. Let's look at each of these steps in details.
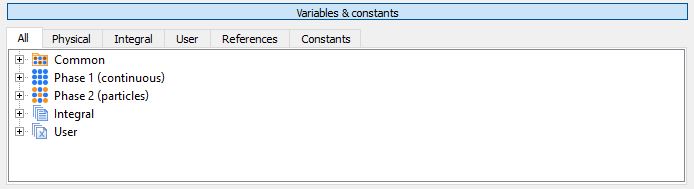
variables and constants
Variables of several types can be used for constructing formulas (this is described more specifically in documentation). The formula editor window Variables & constants contains six tabs.
-
ALL: this tab contains all the variables that are available for use.
-
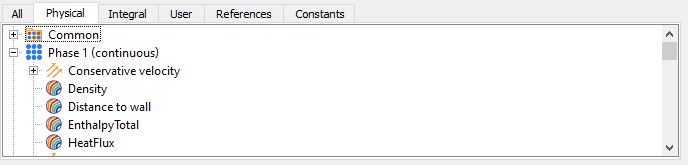
PHYSICAL: variables that characterize physical processes. For example, velocity, pressure, temperature, etc. (see the documentation the full list). Note that in addition to Common variables (calculated in all phases), there are variables that are related to a specific phase only.
-
INTEGRAL: these are characteristics and their integral values. In addition to user-defined characteristics, there are also built-in characteristics. It is very convenient to use them for setting the change in the value of a variable or the level of adaptation depending on the current step or time. You can find a list of all available integral values in the documentation.

-
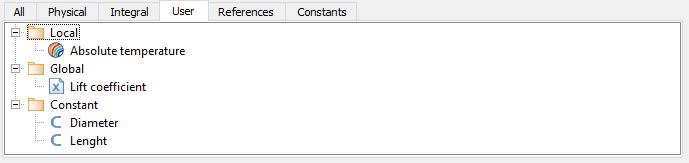
USER: the tab contains variables that were created by user earlier – Local, Global, and Constant. For more information about this type of variable, see our documentation.
-
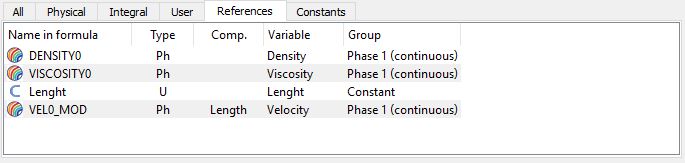
REFERENCES - these are names of variables in formula. After assigning a name to a variable, it will be displayed in this tab. The variable name is saved only within a single window of the formula Editor. This means that if you open the formula Editor window to set other parameter, you will need to set the name for the same variable again.
-
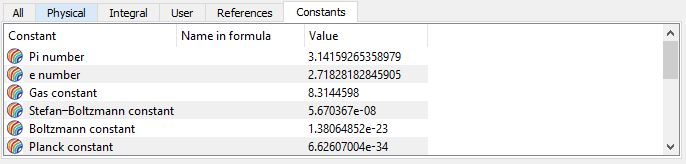
CONSTANTS: here you will find a list of commonly used engineering constants. For example, the π number, the speed of light in vacuum, the Stefan-Boltzmann constant, Planck's constant, and others.
Once we have defined the variables we need, we will proceed to consider how we can handle these variables.
Firstly, as we have already said, you need to give a name to a variable, by which it will be accessed. To do this, just make a double-click on the desired variable and the formula Editor will automatically offer you a variant for a name of this formula and you can change it using the Latin alphabet. After you will add the name, it will appear in the References tab.
Secondly, to get a formula, you need to apply operations to variables.
OPERATIONS
The Operations window contains tabs with different sets of functions. Let's have a look at it (or you may read about it in the documentation):
-
ARITHMETIC
- basic functions of the calculator ( + , -,*,/, module)
- scalar and vector product for vectors
- functions for working with fractional numbers (whole and fractional parts, rounding)
- function that allows to set a linear interpolation
- function that allows to set restrictions for a variable
- function that allows to get a random value in a given range of numbers
-
EXPONENTIAL
- Functions related to raising a number to a power (degree, exponent, root)
- Different types of logarithm functions (base, decimal, natural)
-
TRIGONOMETRIC
- All main direct and inverse trigonometric functions (six functions each)
-
HYPERBOLIC
- All main direct forward and inverse hyperbolic functions (six functions each)
-
LOGIC
- Logical characters (greater than / less than, equal to / not equal to, not / and / or)
- Logical functions (conditional if)
-
STATISTIC
- Maximum and minimum functions (selection of max. and min. values from a set of numbers)
- Sum and product functions (summation and multiplication of specified numbers)
-
EXTERNAL
- Gradient and rotor functions
- Getting maximum and minimum variable values in the whole area
- Ignoring of boundary conditions (is used when you need to get the value of a variable from the center of a wall cell, not from the boundary condition itself)
-
SPECIAL (operations with VECTORS)
- Vector assignment
- Calculating a vector length
- Normalization of a vector
- Calculating the X,Y, Z components of a vector
- The reflection of a vector
USEFUL examples. Frequently used formulas
Of course, you can use formulas to set any complex function for calculating a variable. But we'd like to tell you about some useful techniques for the formula Editor. The most importaint application cases in calculations are cases when it is necessary:
to CONTROL ABSOLUTE VALUES of pressure and temperature INSTEAD OF RELATIVE PRESSURE OR TEMPERATURE
We recommend to read our article about reference values to find out why it is so important to control absolute values. When you set the visualization layers, the Temperature and Pressure variables will be displayed in relative values - the difference between the absolute value and the reference value. To display the absolute value in the layer scale, create a user variable and set the formula:

In the formula Editor in the Variables & constants All > Common or All > Phase N window, find the Temperature variable and double-click it. Do the same for the second variable – Integral > Internal characteristics > Reference temperature.
Please note that you can make comments in the formula by putting // at the beginning.
After creating such a user variable, it can be used for calculating Characteristics, building layers, postprocessing, and so on.
to SET THE VARIABLE DEPENDENCE ON THE TIME STEP OR ON THE CURRENT CALCULATION TIME
Sometimes, if the required variable value is set immediately during the calculation, the solution becomes unstable. In this case, you may set the variable smoothly, depending on the step or time. It is also convenient to set the step dependency for such an important stage of project work as grid convergence research. For example, in the beginning, the adaptation is disabled or its level is low (the maximum level = 0-1). And then the engineer begins to fine-tune the grid gradually, ensuring that the results remain unchanged as the number of control volumes increases. You may simply set the formula in different ways instead of doing this manually,.
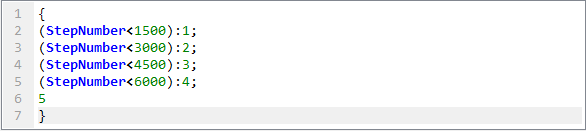
Or so:

In both cases, the level of adaptation is set to increase by 1 every 1500 steps. You can display the controlled parameters in the Monitor window and track how they change depending on the level of adaptation. By the way, you may use a table to set the maximum adaptation level variable in addition to formulas for the same task.
Other useful examples
- To specify the dependency of a variable from the coordinates. You can specify an uneven heat release along the diameter or length of the tube, or the distribution of electric potential on the plate (FlowVision Tutorial – Interaction of two isolators);
- To set properties for substances depending on temperature and pressure;
- To set periodic processes in time (article in our blog)
- To set the dependence of changes in some variables on others, for example, the speed of rotation of one compressor wheel is set according to the speed of the second wheel, taking into account the teeth;
- To set a smooth change of variables to avoid collapse at the beginning of the calculation (article in our blog);
- To set "looped" BCs - to connect Inlet and Outlet (article in our blog);
- To obtain beautiful and informative visualization, for example, of shock waves. Use the density gradient variable for this:

This variable is also often used for creating adaptation by condition
- Obtaining integral values using user formulas, such as Сх, Су;
- Using user constants for BCs, Initial conditions, Modifiers. For example, you can set a variable once for several BCs and / or Initial conditions as a user constant and then reference this constant using the formula Editor.
A SMALL note ABOUT USER VARIABLES
Most often, the formula Editor is for creating user variables - Local, Global, and Constants. Local user variables are calculated in each cell of the computational domain, and global variables are averaged over the entire computational domain. This is why you can't use previously created Local variables for creating global user variables (they can be displayed in the Monitor window).
Conlusion
It is very difficult to describe all the possibilities of using the formula Editor in one article, since it covers all the FlowVision functionality. Therefore, if you have any specific questions, please contact us in tech.support (support@flowvisioncfd.com), we will respond to you, and maybe even write a new article or add some information to this one.